
User Interface Overview
The UI of the to-do app is designed for simplicity, power, and clarity—making it easy to manage both traditional and AI-assisted tasks.
Main Dashboard
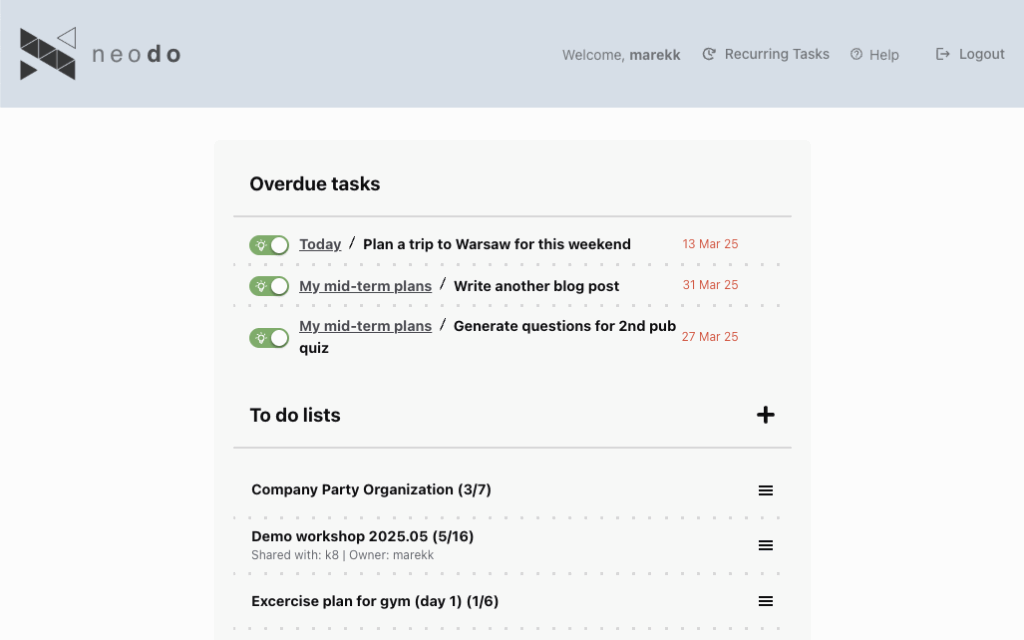
When you open the app, you’ll see the Dashboard, which includes:
- Top Bar (Header)
- User Profile – Manage your email and password, add a personal description, and connect NeoDo with your Gmail and Google Calendar accounts.
- Recurring Tasks – Configure tasks to run automatically on a recurring schedule.
- Help – Link to this help page.
- Logout – Sign out of your NeoDo account.
- Task List Panel (Center)
- Overdue Tasks – Tasks that have passed their due date.
- Tasks with Upcoming Due Dates – Tasks that are approaching their deadline.
- To-Do Lists – Collections of tasks grouped under specific themes or purposes.
- List Title – The name of the to-do list.
- Task Progress – Number of completed tasks versus the total number of tasks in the list.
- List Ownership and Sharing Info – Indicates who owns the list and who it has been shared with (if applicable).
- Hamburger Menu – A menu icon (☰) providing additional options for the list:
- Edit – Rename the list.
- Share – Share the list with a friend or coworker.
- Delete – Permanently remove the list.
To do list
When you click on the list name you will see tasks
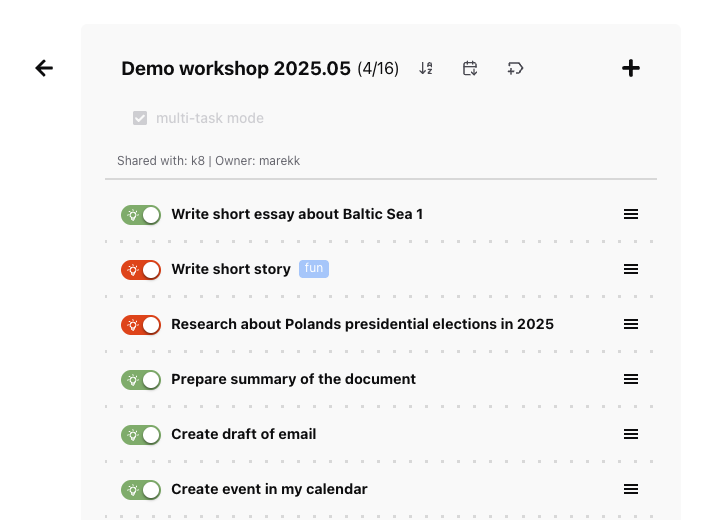
- Task List Header
- Title – “Today (36/41)” – shows the current list and progress (36 tasks done out of 41).
- Icons
← – navigate back.
⇅ – possibly to reorder or sort tasks.
+ – to add a new task.
- Multi-task mode or single task mode switch
- Multi-task mode allows to operate on many tasks at once. You can:
– Mark tasks as complete
– Mark tasks as incomplete
– Solve tasks
– Delete selected tasks
- Multi-task mode allows to operate on many tasks at once. You can:
- Information if list is shared with someone
- Task Items
- Status switch
- Status Icon – Indicates if the task is completed (✔) or not (bulb icon).
- Status Color – describes status of executions of the task by Agent
Grey – not sent to Agent (could be something yo need to do by yourself)
Orange – sent to Agent and waiting for the response
Green – Task was solved by agent
Red – There was an issue and task wasn’t solved by Agent, you can try to send it to agent again
- Task Name: Plain text (e.g., “Buy ingredients for onion soup”).
- Labels
- Due Dates: Shown in red (e.g., “13 Mar 25”) when overdue or scheduled.
- Hamburger Menu (≡)
- Edit – edit task name or description
- Delete – delete task from the list
- Solve – send task to be solved by Agent
- Split – send task to be converted into subtasks
- Transcribe – send attachment of the task to be transcribed (available only if audio file is attached)
- Status switch
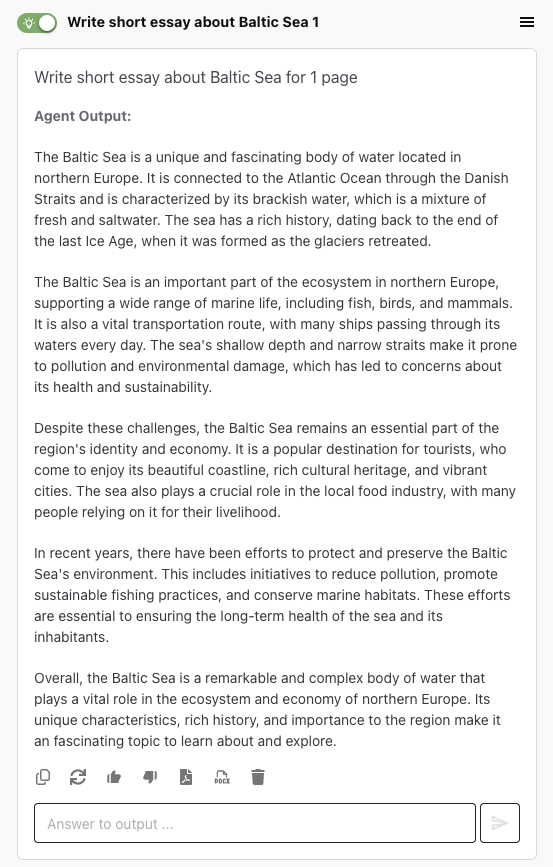
- Task details
- Task Header
- Task title: “Plan a trip to Warsaw for this weekend” – displayed prominently in bold.
- Status indicator: A green dot to the left indicates an active or ongoing task.
- Due date: “13 Mar 25” in red on the top-right shows the scheduled or overdue date.
- Task menu icon (≡): To open further options like edit, duplicate, etc.
- Agent Output Section
- Task description – used by the Agent as instruction: “Find what is interesting to do and to see in Warsaw on 8th and 9th of February.”
- Agent Output: Indicates content or message generated by agent.
- Interaction Toolbar (bottom of response)
Includes a set of action icons:
– Copy agent’s output.
– Possibility to regenerate output if we don’t like it.
– Feedback for the AI-generated content.
– Save output in PDF or DOCX (Word) format
– Delete the Agent output. - Answer to output: you can continue conversation with an Agent
- Task Header
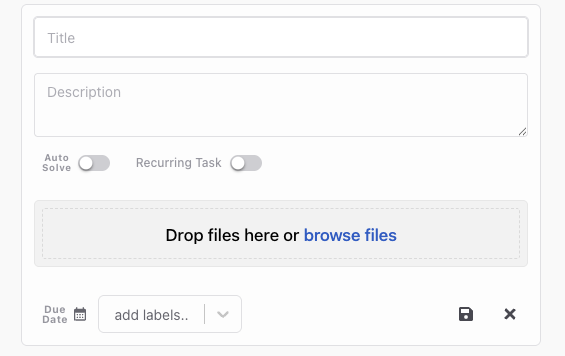
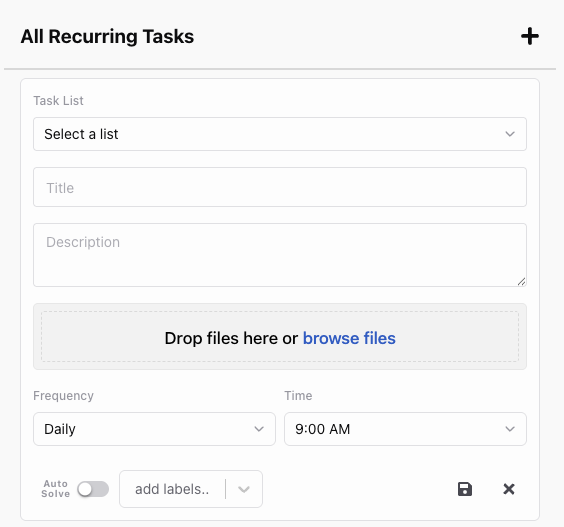
- Add / Edit task
- Title Field – Input box for entering the name of the task.
- Description Field – A multi-line text area where users can describe the task in more detail (e.g., objectives, context).
- Auto Solve Toggle – Switch labeled “Auto Solve” – enables the agent to automatically execute the task.
- Recurring Task Toggle – Allows setting the task as recurring.
- File Attachment – Drag-and-drop area labeled “Drop files here or browse files” for attaching documents or files to the task.
- Due Date Selector – Date input field labeled “Due Date” (with a calendar icon) for setting when the task is due.
- Add Labels – Dropdown to assign tags or categories to the task (e.g., “fun”, “work”).
- Save & Cancel Buttons
Recurring tasks
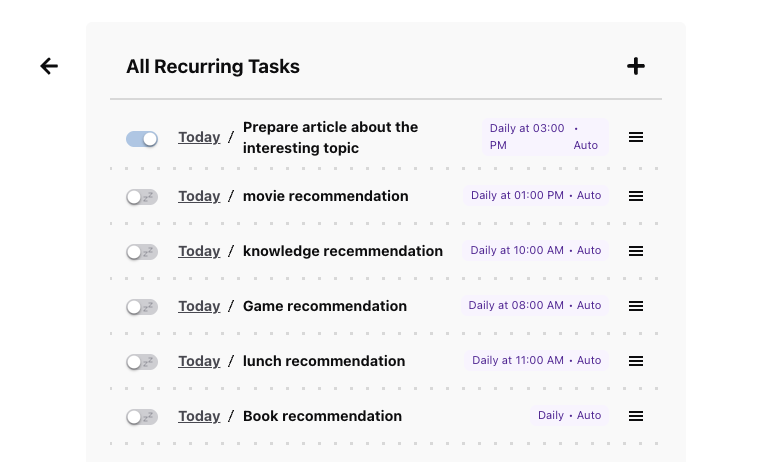
Each row represents a separate recurring task, and includes:
- Toggle Switch – Positioned to the left of each task, this enables or disables the recurrence.
- Name of the list – where instance of the task will be created
- Task Label – Descriptive title (e.g., Prepare article about the interesting topic, movie recommendation).
- Schedule Details
- Example: “Daily at 03:00 PM · Auto”
- Indicates frequency and time of execution.
- Auto suggests the task will be performed or generated automatically by an agent.
- Hamburger menu (≡)
- Possibility to edit or delete recurring tasks.
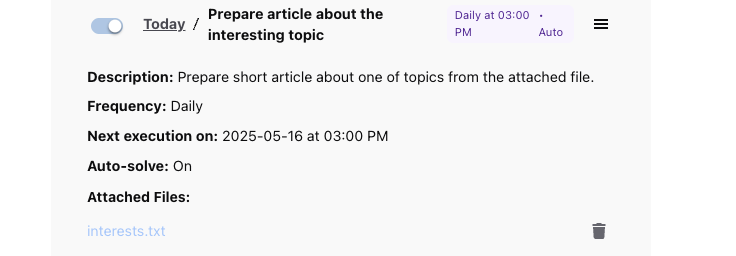
When you click on the task name you can see additional details related to selected task:
- Description
- Frequency
- Next execution date
- Auto solve status
- Attached files
Account settings
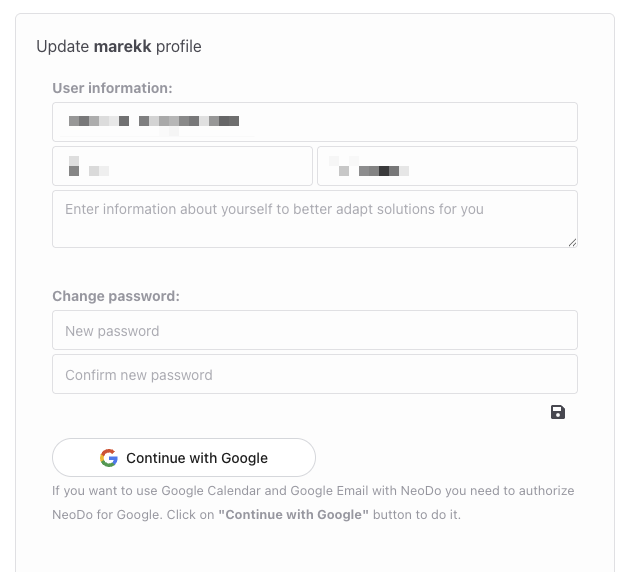
- Update Name and Email – Change your personal details such as name and email address.
- Add Personal Information – Provide a short description about yourself. This helps NeoDo’s agents tailor their communication style. For example, if you describe yourself as a high school student, responses will be simpler than if you identify as a professor.
- Change Password – Update your account password for security.
- Continue with Google – Link your Gmail and Google Calendar to NeoDo. This allows agents to read and send emails on your behalf, as well as access your calendar to view or schedule events.